Customizing taxes
 Updated
by
Heather Jones
Updated
by
Heather Jones
You can create custom tax rules in Xactimate desktop. These do not appear under the Tax Jurisdiction options, and they only apply to the estimate in which you create them. If you want to create custom tax options that can be applied to multiple projects, you must use the Price List Editor. If you are planning to use custom taxes instead of the curated tax jurisdictions for your instance, when the Select tax jurisdiction window appears, you can usually select None or simply close the window; however, for the moment, you must select a tax jurisdiction and add the custom tax on top of it.
Create and add custom tax rates
- From within the estimate, navigate to Claim Info > Parameters > Add Ons > Sales Tax.
- In the Estimate Sales Tax window that opens, select Add...
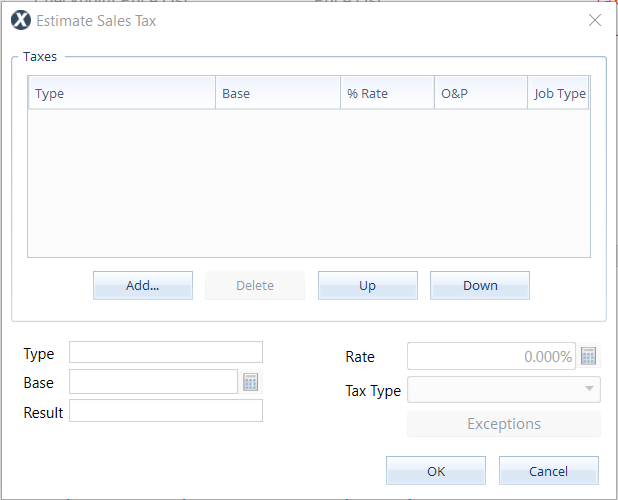
- Enter the relevant information in the visible fields.
- Type: The name you want associated with the custom tax.
- Base: The portions of the line items that are charged (e.g., labor, materials, equipment). You can select the calculator icon, then use the Functions menu to select the options, if you would like.
- Result: The result can be used to create a variable for use as an additional base in other taxes.*
- Rate: The percentage at which the base is taxed.
- Tax Type: This controls whether overhead and profit is added to the taxed amount or overhead and profit is calculated on the tax as well as the base cost (or neither).
- Exceptions: Any variations to the tax rate, as defined in another window. See Tax exceptions.
* For example, given a project that applies taxes on MATERIAL for the base and CLN_TAX1 as a result, and the value of the result is calculated as $100; if you create a different project using the same jurisdiction and a base of "TOTAL + CLN_TAX1", and it has a total value of $1000, it taxes a base of $1100 ($1000 + $100).
- Select OK to save the custom tax.
Tax exceptions
- With the appropriate custom tax selected, select the Exceptions button.
- Select Add Rule (a link, not a button, so you must select the text).
- Select the blank button that appears under the Exceptions Items column. This opens the Exceptions Items window.
- Complete the row as follows:
- Name: The name of the exception.
- Category: The category of the line item(s) you are excluding.
- Selectors: Select All to add all line items in the category to the exception. Select In List to add specific line items to the exception. Select Not in List to exclude items from the category that you do not select.
- Selector List: Selector codes for the appropriate line items.
- Select OK to return to the Exceptions list.
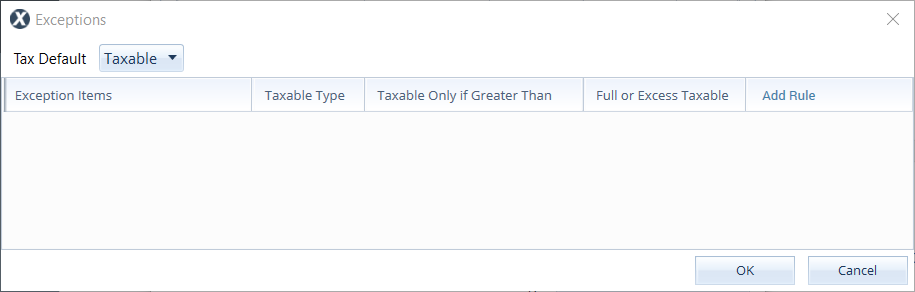
- When Xactimate returns you to the Exceptions window, select the Taxable Type table cell for the appropriate row. This opens a drop-down menu.
- Select Taxable Only If to add rules for when to apply the tax.
- Select the Taxable Only if Greater Than cell for the applicable row and enter an amount.
- Select the Full or Excess Taxable cell to open the drop-down menu.
- Select the desired amount.
- Full Amount: Taxes the full amount of the line item.
- Only Amount in Excess: Taxes only the amount that exceeds the value entered in Taxable Only if Greater Than.
- Select OK to save the exceptions and return to the Estimate Sales Tax window.
Verify the custom tax applies
Because custom taxes do not appear under Tax Jurisdiction in Claim Info > Parameters > Pricing, the best way to verify that it has been applied is to test it, which you can do through the following method:
- From within the modified project, navigate to Estimate > Estimate Items.
- Add a line item that would be affected by the custom tax, if there is not one already in the estimate.
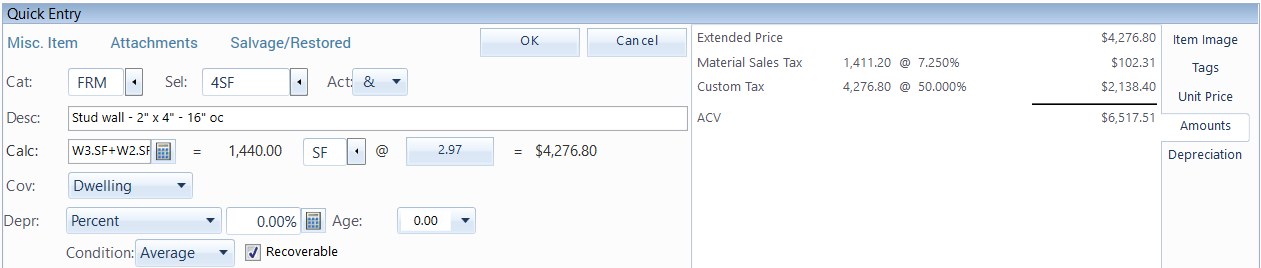
- Select any line item that should be affected to view the item’s details.
- On the right side of the Quick Entry pane, select Amounts. Each applied tax appears in the small pane next to it.
Price List Editor
If you need to create a tax rate that works for multiple estimates, use the Price List Editor. You can find more information about the Price List Editor on the eService Center.