Importing and using underlays
 Updated
by
Heather Jones
Updated
by
Heather Jones
Note: For a full list of importable file types, visit our What file types can Xactimate desktop import? document.
Underlays allow you to use reference images as you create your sketch. You can use various types of images, including aerial, satellite, and drone imagery, along with blueprints and other documents. You can use these images to trace rooms, hallways, and other structures with ease.
To import an underlay image, open an estimate to the sketch and follow these steps:
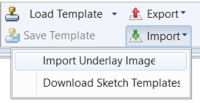
- Open the Options tab.
- Navigate to Import > Import Underlay Image.
- In the window that opens, navigate to and select the image you want to use. Either double-click the image or select it and click Open.
- The image appears in the Import Underlay Image window; find the longest line/length of which you know the dimensions.
- Select one end of the line and then the second. This opens the Set Scale window.
- The Set Scale window opens; enter the length of the line in the field provided.
- If needed, adjust the slider that appears below the image to fade the image however much you need.
- Select OK.
The underlay image appears in your sketch with the appropriate scale so you can simply trace the image to create your sketch to scale.
If you want to remove the underlay image after you have created your sketch, click wherever you can on the image to select it and tap the Delete key (or right-click and select Delete Underlay Image in the menu that appears).