Using the water mitigation log
 Updated
by
Heather Jones
Updated
by
Heather Jones
The water mitigation log in Xactimate Sketch allows you to track climate and saturation readings as well as equipment usage over the duration of the mitigation project.
Before using the log
Before you use the water mitigation log, you must complete the following:
- Create your sketch.
- Add zones to your sketch, as needed (see Creating an XactScope water mitigation sketch).
- Add the affected areas (see Creating an XactScope water mitigation sketch).
- Add the appropriate equipment to the sketch.
Accessing the log
The mitigation log is located within Sketch > XactScope, and the Mitigation Log tab appears next to the Guide tab.
To see log data, complete the following:
- Select a day from the options at the top.
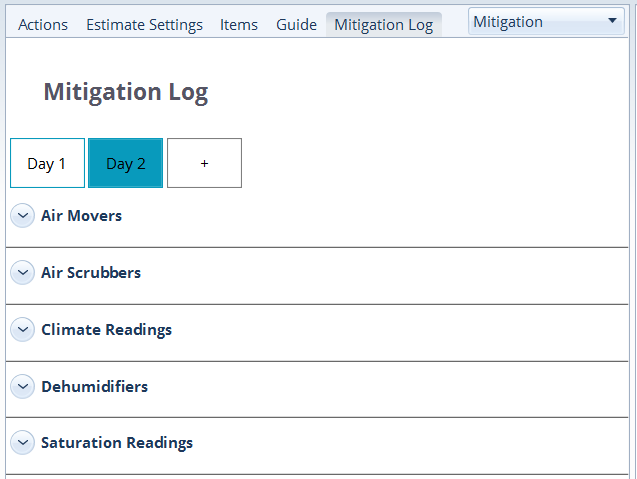
- Select the log you want to view. Options include the following:
- Air Movers
- Air Scrubbers
- Climate Readings
- Dehumidifiers
- Saturation Readings
- Select the down arrow for the appropriate individual reading or equipment.
Editing the water mitigation log
Make any necessary changes in the pane; all changes are saved according to your Xactimate settings.
To add to the mitigation log, perform the following steps:
- Create your sketch, including rooms, mitigation equipment, zones, and affected areas.
- Select the Mitigation Log tab to open it.
- Select the room(s) for which you want to enter data.
- Select the appropriate day or select the + option to add another day.
The cards that appear vary depending on the room(s) selected and the equipment inside.
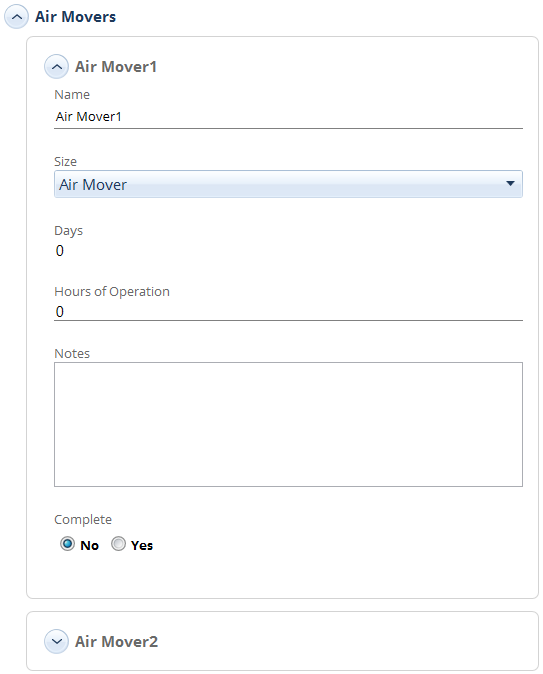
- With the day selected, select the down arrow for the card you need to modify; the information in the XactScope cards differs depending on what reading or equipment you have selected. The options are as follows:
Air Movers and Air Scrubbers
- Name: Enter the name you want to use; this can help you keep track of which air mover or air scrubber you are working with.
- Size: Select the most appropriate option from the drop-down menu.
- Days: This field updates automatically.
- Hours of Operation: Enter the hours the equipment has run since the previous reading. This can be a value greater than 24 hours.
- Notes: Add any notes you need.
- Complete: When you are done obtaining data for a specific air mover or air scrubber, change the Complete radio button to Yes to disable this reading for future days.
Climate Readings
- Name: Enter the name you want to use; this can help you keep track of which reading you are working with.
- Temperature: Enter the temperature of the reading location.
- Humidity: Enter the humidity of the reading location.
- GPP: This field updates automatically.
- Dew Point: This field updates automatically.
- Air Vapor Pressure: This field updates automatically.
- Days: This field updates automatically.
- Hours of Operation: Enter the hours the equipment has run since the previous reading. This can be a value greater than 24 hours.
- Notes: Add any notes you need.
- Complete: When you are done obtaining data for a specific reading, change the Complete radio button to Yes to disable this reading for future days.
Dehumidifiers
- Name: Enter the name you want to use; this can help you keep track of which reading you are working with.
- Size: Select the appropriate dehumidifier from the drop-down menu.
- Days: This field updates automatically.
- Hours of Operation: Enter the hours the equipment has run since the previous reading. This can be a value greater than 24 hours.
- Temperature: Enter the temperature of the location.
- Humidity: Enter the humidity of the location.
- GPP: This field updates automatically.
- Extracted (pints): Enter the number of pints extracted by that point.
- Notes: Add any notes you need.
- Complete: When you are done adding data for a dehumidifier, change the Complete radio button to Yes to disable this reading for future days.
Saturation Readings
- Name: Enter the name you want to use; this can help you keep track of which reading you are working with.
- Material: Enter the material type from which the reading was taken.
- Drying Standard: Enter the moisture content percentage at which the material would normally be considered dry under normal moisture content conditions.
- Drying Goal: This field populates automatically based on the drying standard and acceptable ranges.
- Location: Select the location of the readings from the drop-down menu.
- Saturation: Enter the saturation from the location.
- Surface Temperature: Enter the surface temperature of the reading location.
- Notes: Add any notes you need.
- Complete: When you are done obtaining data for a specific reading, change the Complete radio button to Yes to disable this reading for future days.