XactRebuild
 Updated
by
Heather Jones
Updated
by
Heather Jones
XactRebuild is a feature within Xactimate that allows users to create rebuild estimates based on the data from an existing water mitigation estimate. It is available for Xactimate Professional users but the send option must be enabled in Xactimate Admin (see Setting up Rebuild estimate in Xactimate Admin for details). Not all companies have the send XactRebuild estimate option enabled; if you want to add it, contact your account manager.
XactRebuild allows you to select an estimate with at least two water mitigation items and create a nearly identical rebuild estimate. Rebuild estimates exclude photos, manual pricing changes, and internal notes but retain claim information, sketches, and coverage information. Rebuild estimates also convert any WTR items to their corresponding rebuilding line items. For example, a regular estimate might have WTRBASE, WTRCABFH, WTRDRYNLF, and WTRFCW; but the corresponding rebuild estimate would populate with FCWAVPF, DRYLF, CABCLAST, CABFH, PNTB1SP, and FNCB3.


You can send estimate data for a rebuild estimate to your own instance or to a different one (called a target instance) that has been set up in Xactimate Admin. If you send the estimate to another instance, it will include a rough draft report. If your instance has target destinations set up in Xactimate Admin, there are additional steps, which are explained in the Target instance workflow section.
There are two options for creating a rebuild estimate: the automated and the user-directed workflows.
Methods of creation
Automated workflow
The automated workflow only works for assignments. If you are using this workflow, creating the rebuild estimate does not require any work in Xactimate. To use this workflow, the original assignment must have been created in XactAnalysis with a data set and profile that support XactRebuild. (The destination instances are set up in Xactimate Admin.) The assignment is then sent to Xactimate. Once it is completed and returned to XactAnalysis, and the QA status is changed to Approved (according to company workflows), the system automatically creates the rebuild estimate.
User-directed workflow
To create a rebuild estimate, the original estimate must meet the following requirements:
- The estimate has at least two WTR line items.
- The estimate’s profile has XactRebuild enabled.
If the estimate meets these requirements, select it in the project list to open the side menu. In that menu, select the Create rebuild estimate icon ( ). If you have met all the requirements, the new rebuild estimate appears automatically in your instance, and it is unassigned. If you have not met all the requirements, you instead receive an error message explaining what is missing.
Sending to a target instance
Whether or not you are set up to create a rebuild estimate within our current profile, if your instance and profile have been set up for the target instance option, you must complete an extra step after you select the Create rebuild estimate icon. The following screen, or a variation of it, appears:
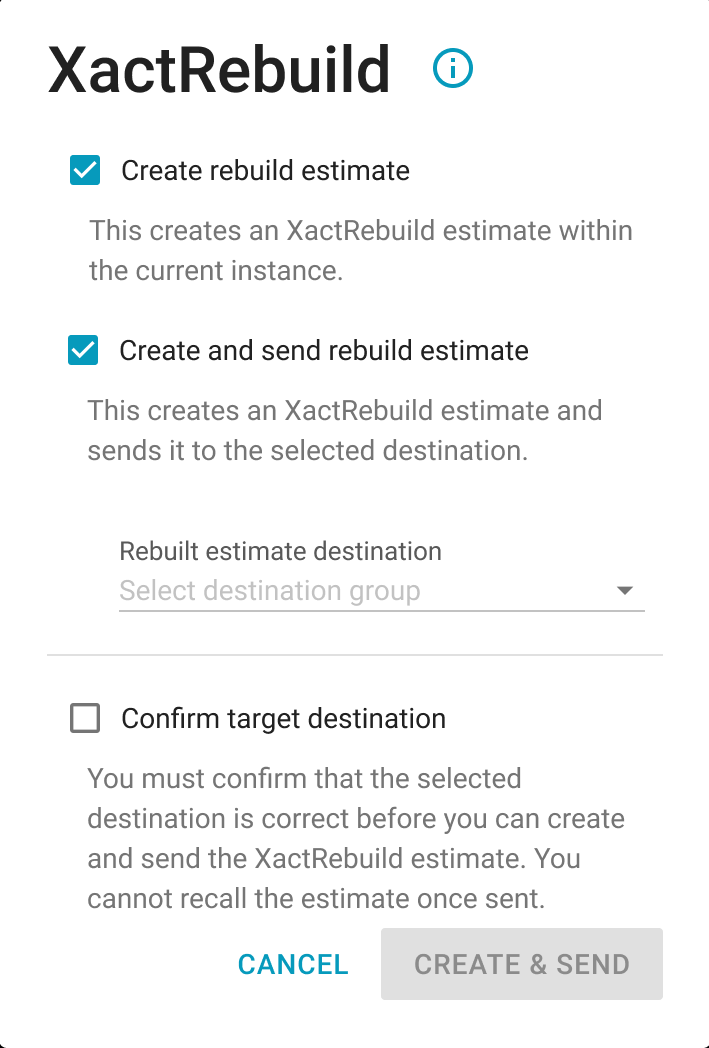
The options that appear vary depending on your settings. Use them according to the following:
Create rebuild estimate
This only appears if your profile has Create Rebuild Project in Same Instance enabled. Select it if you want the rebuild estimate created in the current instance (either instead of or in addition to sending it to a target instance).
Create and send rebuild estimate
This always appears in this dialog. Select it if you want to send the rebuild estimate to another instance. You must also select the drop-down menu to choose the appropriate target instance. This list is customized in Xactimate Admin.
Confirm target destination
Once you select Create and send rebuild estimate as well as the target instance, this section appears. You must select this checkbox to confirm the target destination before you can continue.
Once you fill out the screen as appropriate, select CREATE & SEND.
Using the rebuild estimate
Rebuild estimates are functionally the same as regular ones in Xactimate. They appear in the project list with the same name as the original but with an R added to the end of the project name. When first created, they are unassigned, so you must search in the Cloud list to find them unless you have already downloaded them.
Complete the rebuild estimate as you would any other estimate.