Creating a regular or custom staircase
 Updated
by
Heather Jones
Updated
by
Heather Jones
Regular stairs
Regular, standard stairs are placed on the sketch with certain default settings, as seen in the screenshot below.
Staircases are considered separate rooms and cannot be placed in existing rooms. Once placed, you can make any necessary adjustments.
- Select the arrow on the Staircase button to open the staircase options.
- Select Regular.

- Move the cursor (with the attached staircase preview) to the appropriate location on the sketch workspace and left-click the mouse to place the staircase.
- Modify the width and length of the staircase as you would any other room (click and drag or type the new dimensions on the appropriate walls).
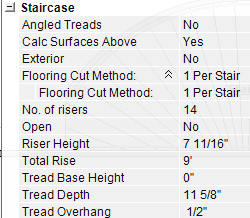
- Open the stair properties to change the number of risers, tread depth, etc.
Custom stairs
Custom stairs are more versatile than regular stairs and often include a landing either at the top or at a bend in the staircase. Be aware that staircases are considered separate rooms and cannot be placed in existing rooms.
Once placed, you can make any necessary adjustments.
- Select the arrow with the Staircase button to open the staircase options.
- Select Custom.
- Move the cursor (with the attached single-stair preview) to the appropriate location on the sketch workspace (the stair attached to the cursor is the bottom riser). Left-click the mouse to place the staircase.
- Move the cursor again in the direction in which the stairs ascend.
- Click to complete the risers.
- Move the cursor to adjust the landing and click again when it looks right.
- Repeat Steps 3–6 as needed to finalize the staircase.
- When the full staircase is on the sketch, press Esc on your keyboard to exit the tool.
- Modify the width and length of the staircase as you would any other room (click and drag or type the new dimensions on the appropriate walls).
- Open the stair properties for each section to change the number of risers, tread depth, etc. See Add an angled tread to a staircase in X1 for details on creating angled treads.