Using lidar to create a sketch
 Updated
by
Heather Jones
Updated
by
Heather Jones
If your device is equipped with lidar, you can use it with Sketch AR to quickly create precise sketches. You can use Sketch AR with lidar to capture the building interior, the exterior, or both. These instructions are specific to using lidar; if you need further information on using Sketch AR in general, see Sketch AR in Xactimate mobile.
Use the following steps to create a sketch with lidar.
- In the Sketch window of your estimate, open the room flyout menu.
- Select Sketch AR.
- In the window that opens, select Interior Capture (or Exterior Capture, if you are working on the exterior).
- Record walls, doors, and missing walls as described in the following sections. When you have all the information recorded for a room, tap End Room in the top right corner to open the initial sketch.
- If the sketch is correct and complete, tap Confirm. If you need to make adjustments, tap Go Back and make changes as necessary.
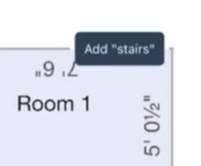
As you finish each room, they are connected in the sketch viewer by their doors based on the door names you provided. You can then tap the appropriate Add "Room" button to move on to the associated room.
When the full sketch is complete in the sketch viewer, tap Return to Sketch at the top left to open the data in Sketch.
Walls
Swipe the scrolling menu above the capture button to the WALL option to enter the wall mode. Follow the instructions at the top of the screen and in the information window:
- Add Room Label: enter a label for the first room and tap Save Room Name.
- Capture the Floor: angle the device so the square in the center of the screen aligns on the floor of the room, and tap the capture button.
- Place the square on a WALL SURFACE and tap the button to capture: angle the device so the square in the center of the screen aligns on your first wall, and tap the capture button.
- Place the square on the NEXT ADJACENT WALL and tap the button to capture: turn the device to do the same thing on the adjacent wall, and continue throughout the room, marking every wall in the same manner.
Once you have fully circled the room, recording every wall, the measurements appear on the screen with the labels for each wall.
Openings
Swipe the scrolling menu above the capture button to the OPENING option to enter the opening mode. Follow the instructions at the top of the screen and in the information window:
- Capture the FIRST corner of OPENING: angle the device so the dot in the center of the screen aligns with a corner of the missing wall, and tap the capture button.
- Capture the OPPOSITE corner of OPENING: perform the same alignment and capture for the opposite diagonal corner.
- What is the opening type? tap the appropriate opening type from the list provided.
- Door Name/Missing Wall Name: enter the name of the room or space to which the door or missing wall connects (only applies for doors and missing walls).
Heights
Swipe the scrolling menu above the capture button to the HEIGHT option to enter the height mode. Follow the instructions at the top of the screen and in the information window:
- Capture the FLOOR: angle the device so the dot in the center of the screen aligns with any portion of the floor, and tap the capture button.
- Capture the CEILING: perform the same alignment and capture for the ceiling.
Photos
Swipe the scrolling menu above the capture button to the PHOTO option to enter the photo mode. Tap the capture button to take a picture and store it under whichever room you are currently creating. You can later access your photos by navigating to Photos in the project left menu.
Adding Exteriors
Complete any interior Sketch AR capture you are working on and reopen Sketch AR to the Exterior Capture option. Swipe the scrolling menu above the capture button to the EXTERIOR option to enter the exterior capture mode. Follow the instructions at the top of the screen and in the information window:
- Place the square on a WALL SURFACE and tap the button to capture: angle the device so the square in the center of the screen aligns on your first wall, and tap the capture button.
- Place the crosshair on one CORNER of the surface and tap the button to capture: angle the device so the 3D crosshair aligns with any corner of the current wall, and tap the capture button.
- When all points have been captured, return to the BLUE CORNER to complete the surface capture: use the crosshair to capture all the corners of the current wall (capture them in clockwise order) and again capture the original, blue corner to complete the wall outline. Yellow and black lines appear along the border of the wall (thick yellow lines mark a previously completed wall, thin yellow lines are perpendicular to the last corner you marked, and black lines mark completed edges).
- Place the square on the NEXT ADJACENT WALL and tap the button to capture: turn the device to do the same thing on the adjacent wall, and continue around the building, marking every wall in the same manner.